
If you follow lots of blogs, you’ve probably been reading about The Great Food Blogger Cookie Swap. A&C also participated in a Christmas ornament version of the swap as well, called the Merry Mail Ornament Exchange. It’s a great concept: bloggers apply and get matched into groups of 4 people. You make 3 ornaments and send one to each of the other people in your group, and you also receive 3 handmade ornaments in turn. It’s a fun way to freshen up your Christmas tree and make some new friends!
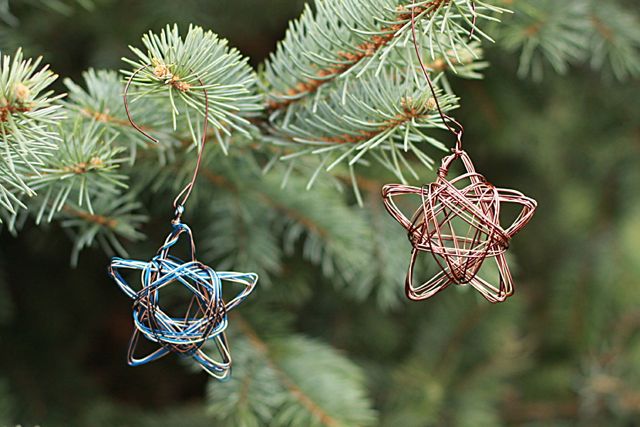
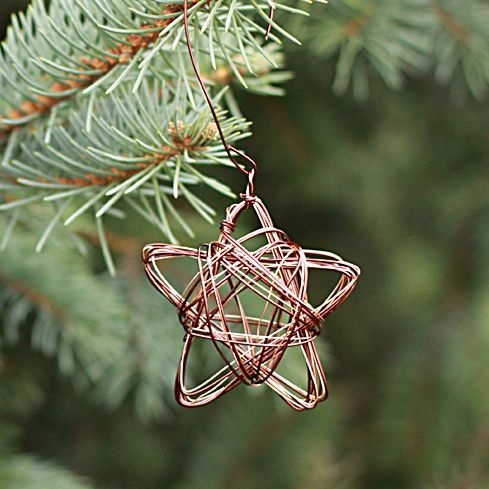
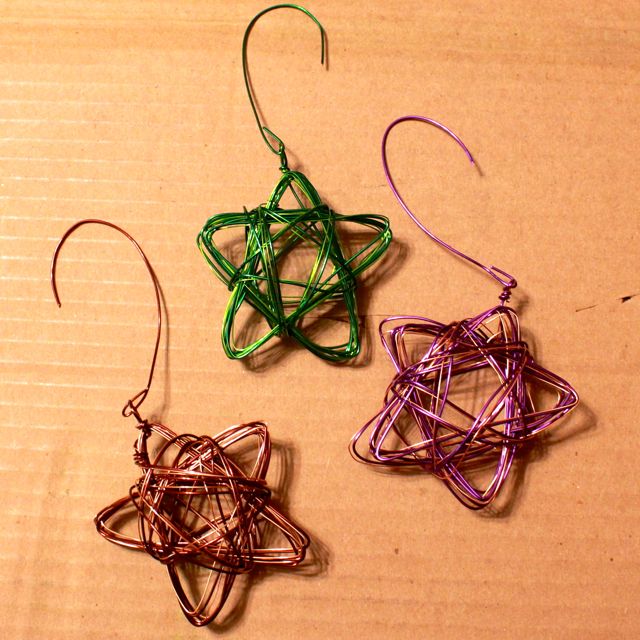
We auditioned a few different ornaments to determine which ones we liked enough to send to our blogger buddies. These star ornaments were something we’d never really seen before and we were really excited to share them with everyone that we knew! They aren’t exactly easy to make, but you end up with a really beautiful ornament. And we loved that we could customize the colors so that everyone got something just a little bit different.
A special thanks to Alyssa’s dad, Jim, for his help in making our concept come to life! You’ve seen him help out with power tools elsewhere around the blog, and he also helped act as an engineer for this project.
To make the template:
The template is the most difficult part of the project. You’ll need a piece of paper and pencil, a piece of wood (read instructions for more specific information about the wood), tape, a small piece of colored tape (painter’s tape or washi tape would work), 6 nails, and a drill.
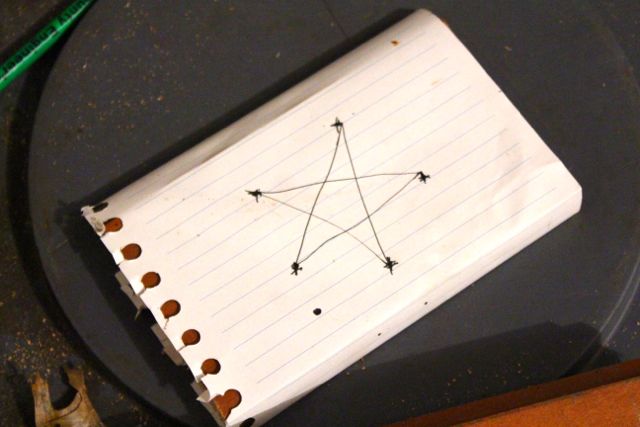
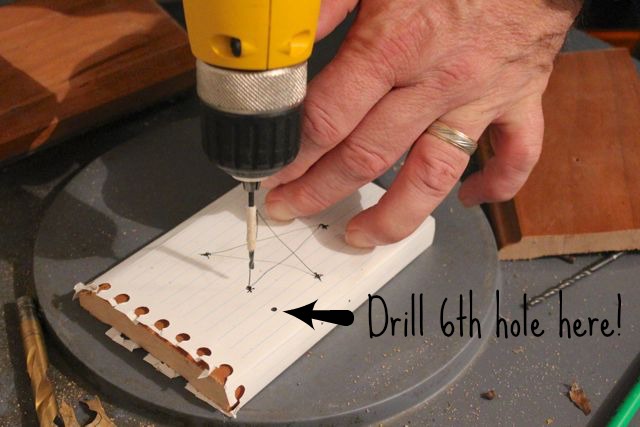
1. Draw the star outline that you want to replicate in your ornament on a piece of paper. Make sure it’s the appropriate size for your tree, but ours was about 4 inches tall.
2. Find a piece of wood that’s large enough to fit the outline and tall enough that you can drill small holes for nails to fit into without going all the way through the wood. Tape the paper to the wood.
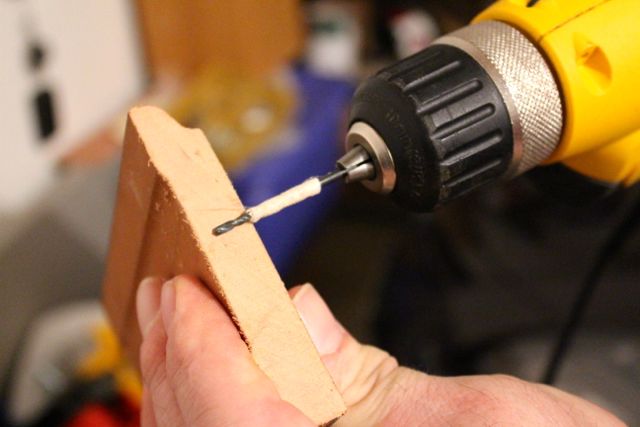
3. Select a drill bit that’s the same size as your nails. You want to be able to pull the nails in and out of the wood with some effort. They still need to be pretty firmly anchored in the wood.
4. Tape off your drill bit so that the bottom of the tape signals when you want to stop drilling. You don’t want the holes to go all the way through the wood.
5. Drill into each of the 5 points of the star. Drill a 6th hole slightly off to the side. This will anchor your wire when you start actually making the ornaments.
6. Insert nails into each hole.
You’ll need: 2-3 pieces of fairly soft colored wire (the kind you buy in the jewelry-making section of the craft store is best). We used different combinations of 20-30 gauge wires. Each piece needs to be about 9 feet long. Also, you’ll need wire cutters and possible needle-nosed pliers.
1. Line the pieces of wire up and create one bundle with them.
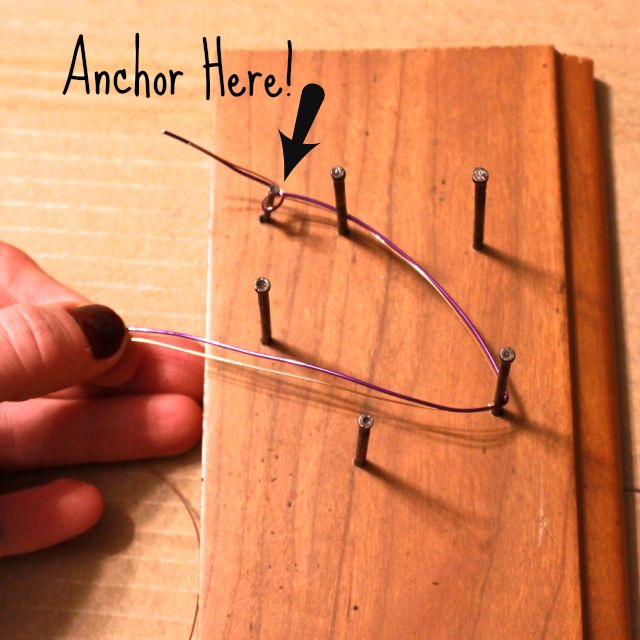
2. Anchor one end to the template by wrapping it around that 6th hole, the one that isn’t actually part of the star.
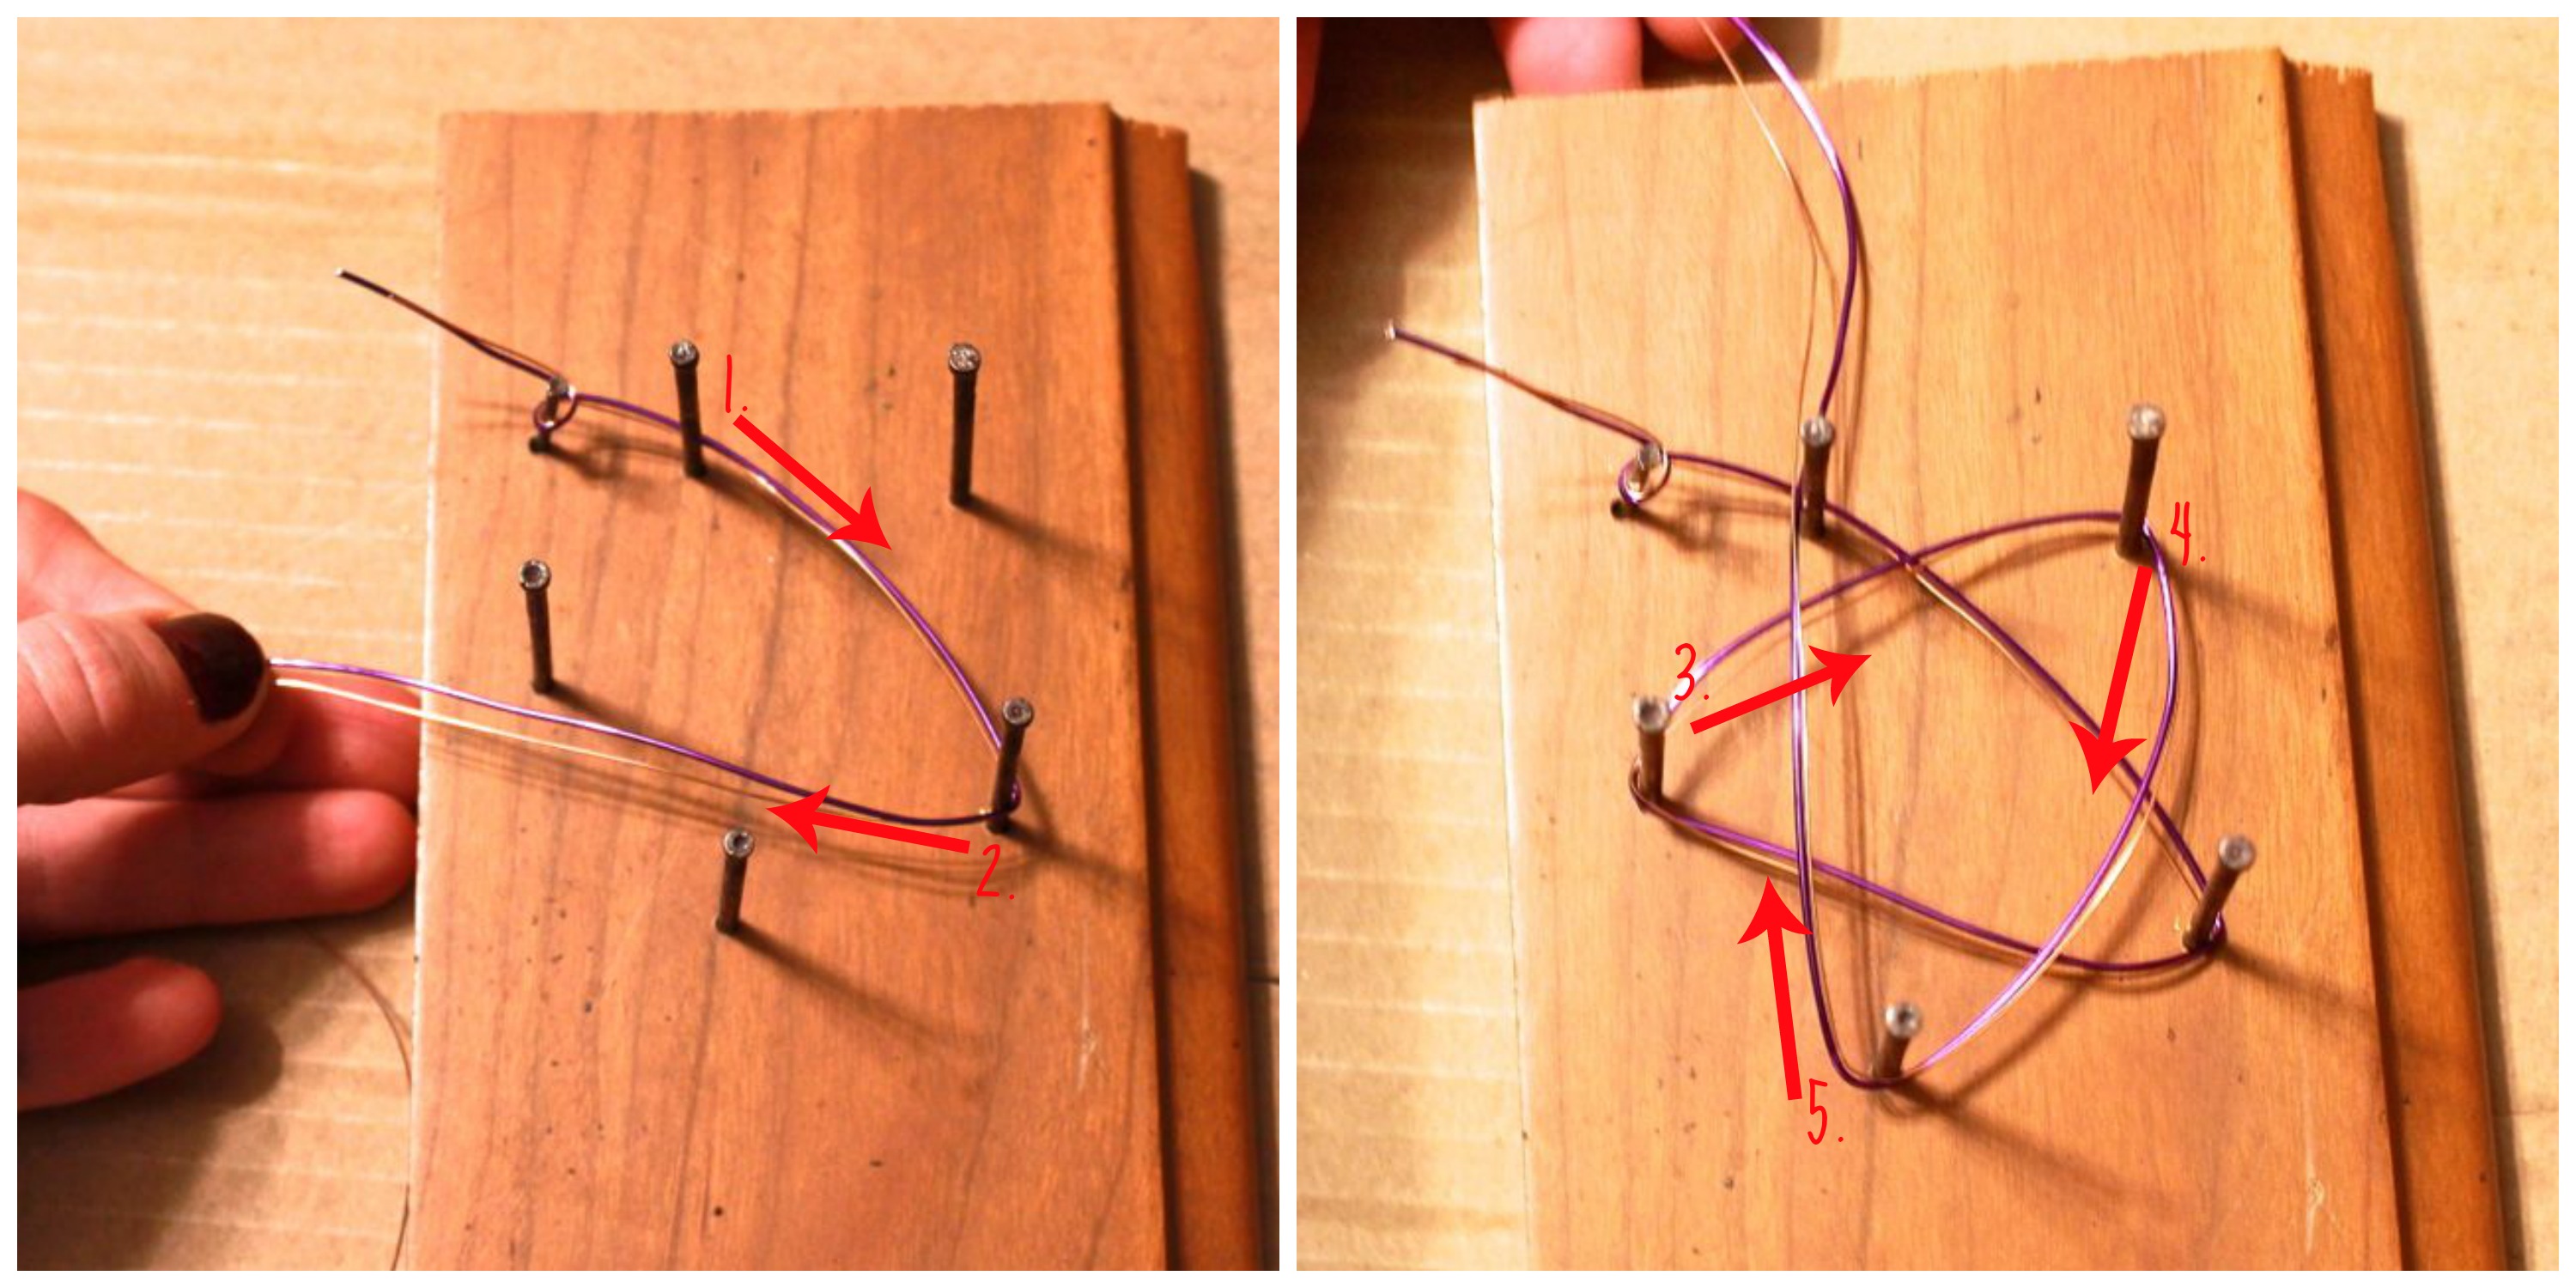
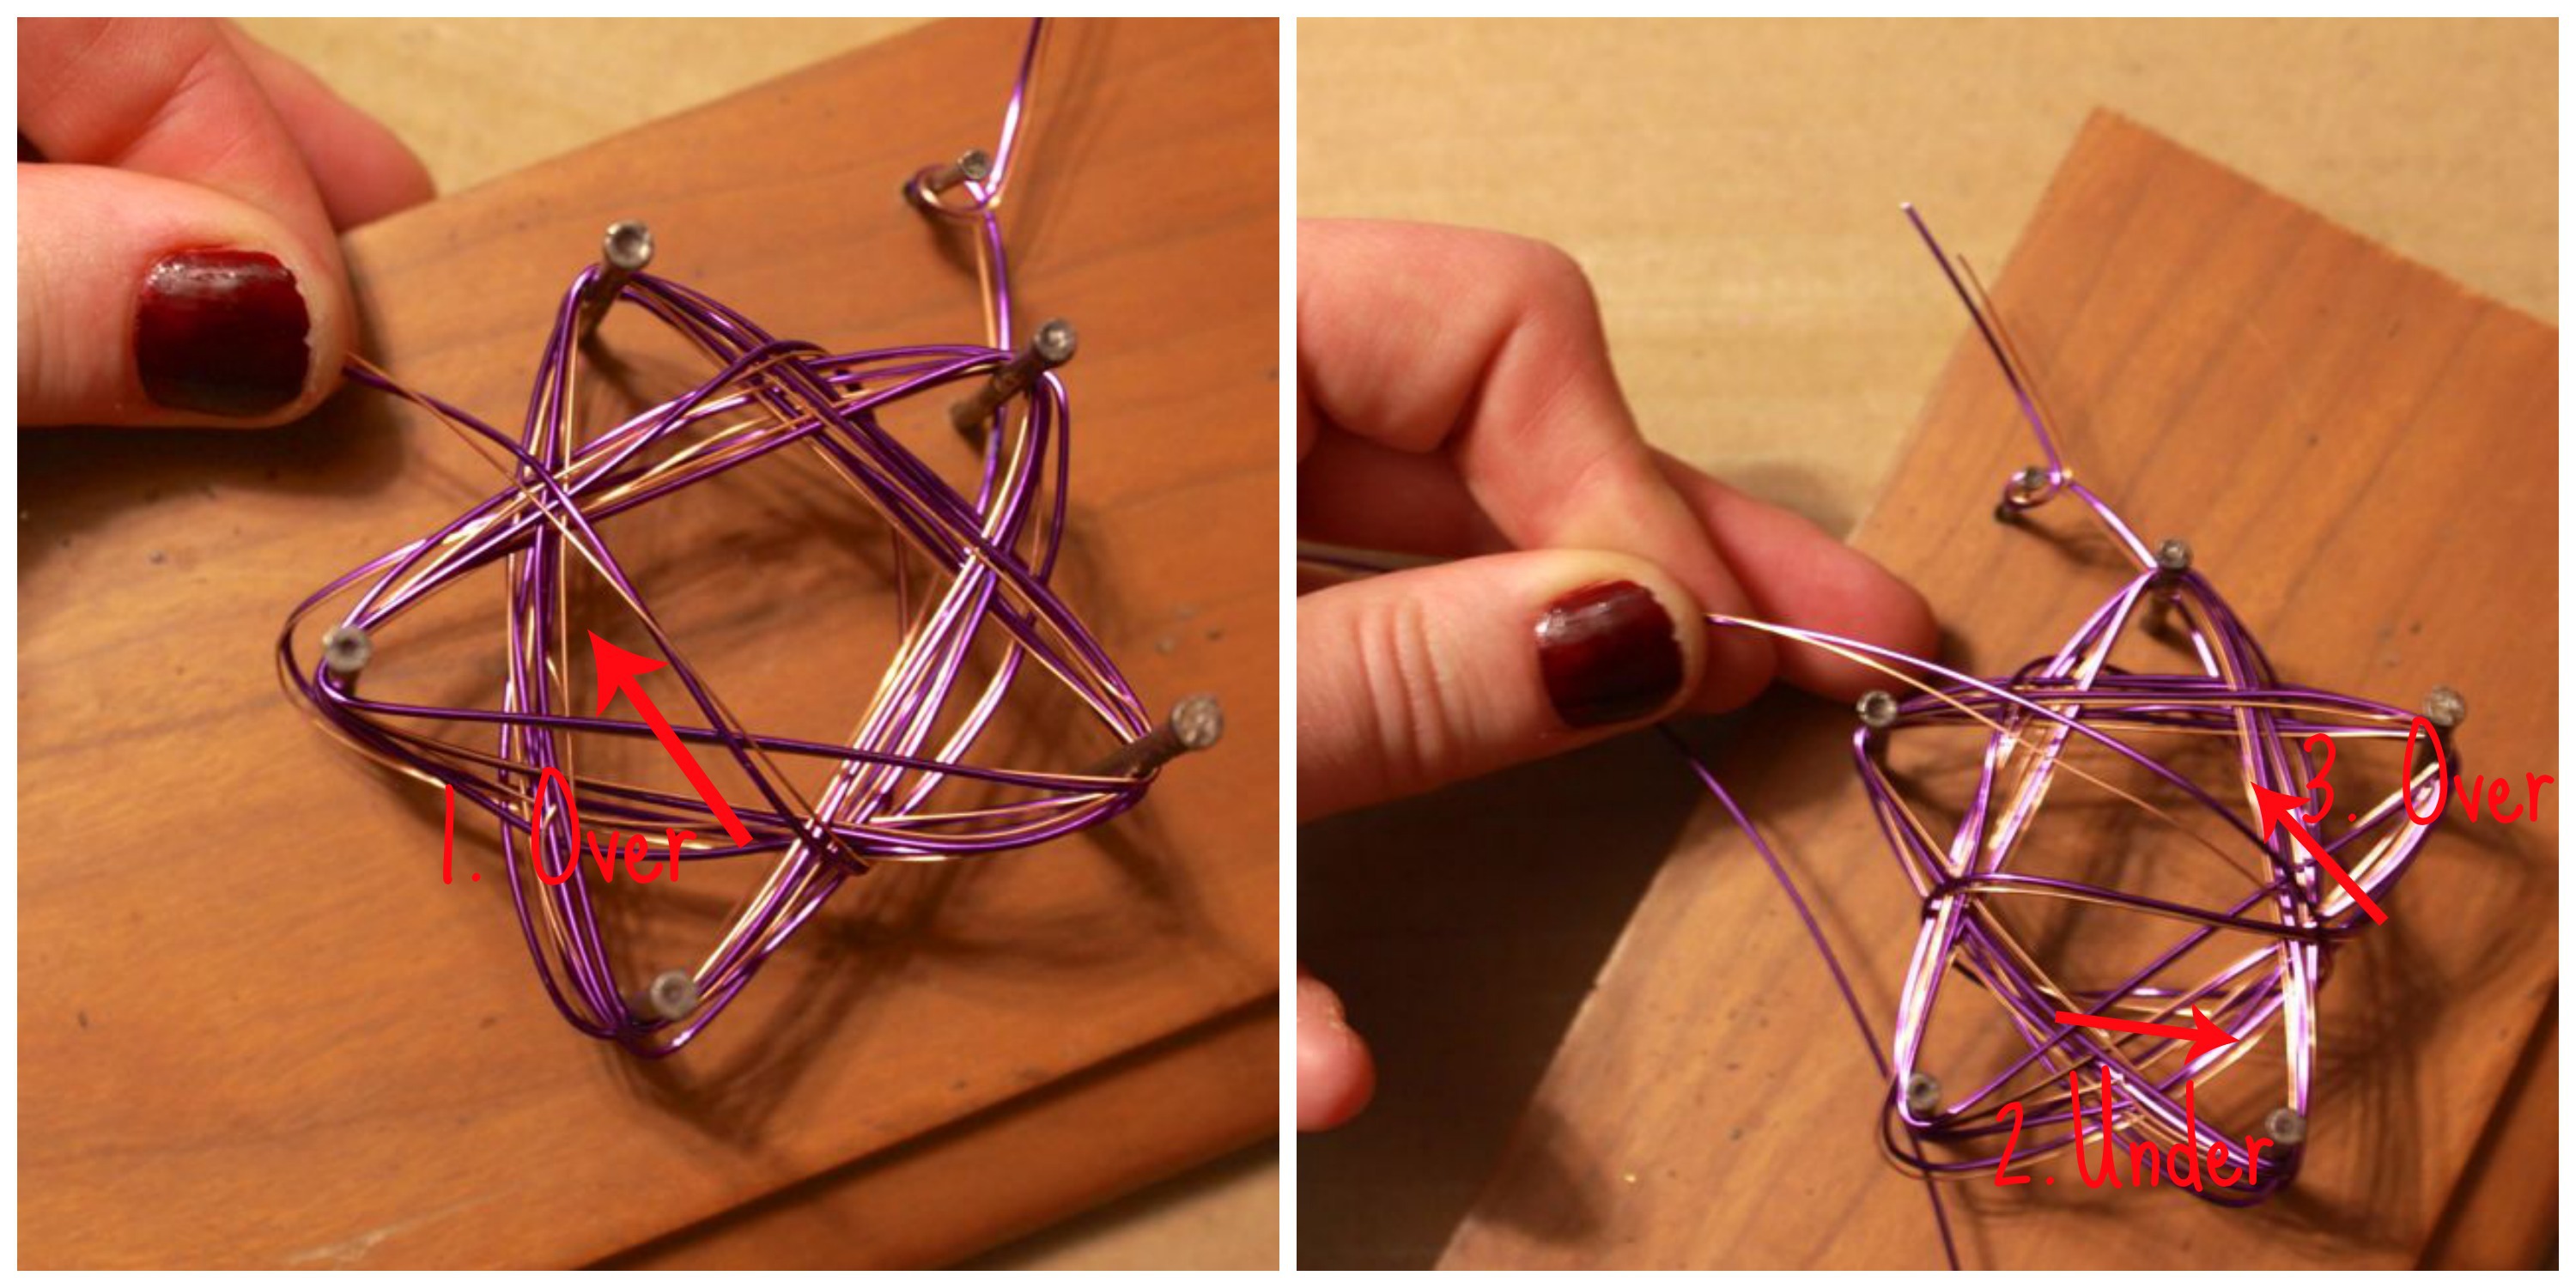
3. Begin drawing a star pattern with the wire, hooking it around each point of the star. Keep the wire fairly taut, but you don’t necessarily want to create sharp angles at each nail. The looser your wire, the softer the star will look.
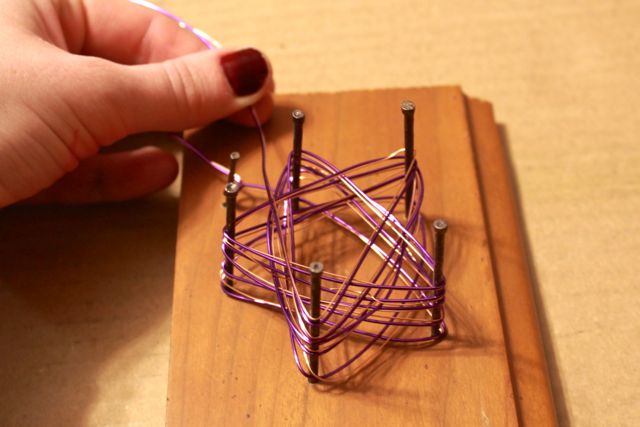
4. Repeat until you have about 2 feet of wire left. We wrapped ours about 5 times, but yours will vary based on the size of the star that you drew for the template.
5. Now you’re going to wrap the remaining wire around the inside angles of the star. This will keep it from unravelling when pull it off the template. You’re basically wrapping up all of the wire into a neat package. Thread the wire under the star and back over the top, making loops that connect each of the inside angles. Continue until you have about 4 inches of wire left.
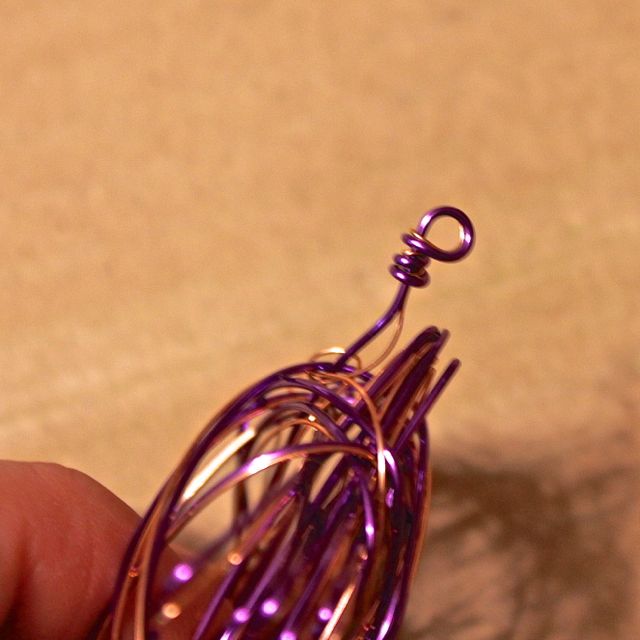
6. Wrap the end around the last point of the star once to hold the shape. Use the remaining wire from the to create a small loop. This is where you can attach an ornament hook or string a pretty piece of ribbon to hang it on the tree. Pull the nails out of the template and remove the star.
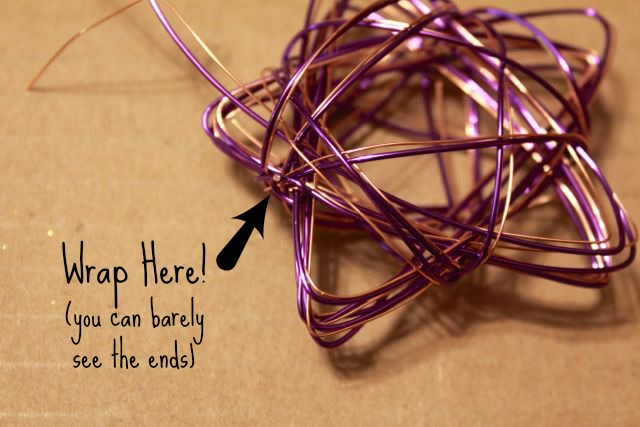
7. Wrap the anchor end of the wire around a point on the star where it won’t be noticeable. Trim any loose edge with the wire cutters.
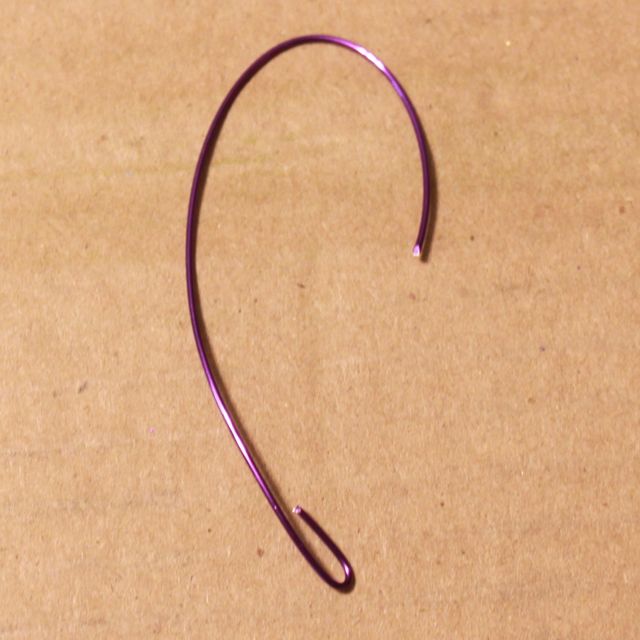
8. You can use any extra wire pieces to create a coordinating wire hook, if you’d like!
We played around with some fun color combinations. This wire is available in a wide variety of colors in the jewelry-making section of almost any craft store.
The other members of our Merry Mail group included Jamie from Sincerely, Moi. She has a cute etsy shop and sent us sparkly rhinestone mason jar lid ornaments. Jess from Foreign Room send a painted birch round ornament (glad to see we’re not the only ones obsessed with birch rounds!) Thanks, ladies, for your lovely ornaments!


My star was gorgeous and I loved how it was green! Thank you so much! I can tell you worked hard on them! I have to follow your tutorial and try it out myself 🙂
What lovely little creations! I’m definitely going to have to try this when I go home for Christmas (and steal some wood from dad!)
-Jenni from Bottomley Cottage
http://www.bottomleycottage.blogspot.ca
Hi Jenni! Let us know how it goes 🙂
We’re so happy to have discovered your blog, and your etsy shop is ADORABLE! Such talent!
Oh why thank you! You’ve got a lovely shop yourself 🙂
Oh those are so sweet! Well done!
Hi iHanna, thanks for the nice comment 🙂 We’re happy to have discovered your blog, what an eclectic aesthetic you have!
WHAT A LOVELY LITTLE ORNAMENT- I have one of those peg boards for wrapping wire and I wonder if that would work – sure would save me a lot of time making the wood thing! Will give it a try,
thanks so much for sharing and have a happy holiday!
Hey Lis, thanks so much!
I think a pegboard should work. The only issue I can foresee is if your pegs are too short and you wouldn’t be able to do as many turns around the star without the wire popping off. My pegboard is for jewelry-making so the pegs are only about an inch high, maybe. But hopefully yours will work – would love to hear how it goes 🙂
Happy Holidays!
Oh, I said I wasn’t going to make ornaments this year and now I want to make these! Goodwill had a lot of this wire for sale a while back and I bought some and gave most of it to my sister. I think I have a couple of rolls left. Your ornaments are very cool!
Thanks, Martha! Let us know if you make them, we’d love pics or just to hear how it went 🙂
These are so beautiful! Brilliant idea!
What a clever idea! these look great and I would never have guessed how you made them. x
Thanks, Kate! It was a fun project to come up with 🙂
These look great! I use a metal star cookie cutter to form the outline and wrap the ornament with thinner wire strung with small beads. My students give these as parent gifts.
Thanks, Amy! The bead idea is so fantastic, thanks for sharing. Can I ask how old your students are? We’d love to see photos, too, and if you have any you can tag us on facebook, instagram or tweet them at us 🙂
What gauge is the wire you used and were the beads already on the wire? Sounds like it gives it some bling.
Hi Karen, the gauge wire would depend on the bead you’re using, but something around a 22 gauge is usually a good place to start. I suggest stringing them ahead of time and dividing up the beads as you make the star shape, since you’ll be putting bends into the wire that beads might have a hard time moving over. Let me know if you make them!
Wow, that’s such a great and unique idea for a christmas ornament! I think, I’ll have to remember it for next christmas 😉
Thanks for sharing! 🙂
So cute…..;-)
What gauge wire did you use?
Hi Denise, I used 20 to 30 gauge wire. I actually like to mix different gauges, it looks really pretty! As long as it’s fairly soft wire and bends pretty easily, any gauge will work.
Hi Denise, I used 20 to 30 gauge wire. I actually like to mix different gauges, it looks really pretty! As long as it’s fairly soft wire and bends pretty easily, any gauge will work.
I have been making ornamets for a few years and decided to try the star ornament. I got 22 gage wire and 24 gage and I am having a lot of trouble with the wire. I am wondering if the gage number should be lower!
Hi Carolyn, you can buy wire in different hardnesses, and the stuff in the jewelry-making section of the craft store is generally pretty soft. I use the different colored stuff that comes on a spool or in wound lengths packaged in plastic (the stuff off the spool tends to be easier to work with). If your wire is from the hardware store, it might be a little difficult to work with because it’s probably harder. It will also depend on what kind of metal it’s made of, as some metals are harder than others. I’m sorry you had difficulty, I wish I could help more! Good luck.
Thank you for the information. I did go back to the craft store and after much discussion with the staff discovered that the wire in the jewelly section was my best option. I also discovered that the star template that my husband make for me was way too big. Since then I have tried two different sizes and the smallest works the best. It should of been a very easy project and just the way things worked out it didn’t happen that way. LIve and learn….thanks p.s. I am just seeing your message now….I should of checked earlier…I would of know to go directly to the wire in the jewely dept.
Hi Carolyn, I added a few tweaks to the instructions based on your valuable feedback. Thank you so much for commenting, and I hope you enjoyed the results of the ornaments at the end of the day!
Hello,
how big are your stars?
Because we wanna make them, but 9 feet seems a bit long for a single star…
Thanks!
Hi Caro,
To make an ornament for a full-sized tree, my stars are about 4-5 inches tall. You can try to use less wire, but it may look a little flimsy at the end. You may have a little bit leftover, but I think that 9 feet gives you a substantial-looking star with enough to make an ornament hook. I usually do 9 feet in 2 or 3 different colors, so it ends up being quite a bit of wire. You can also make smaller stars to use less wire. Good luck!
on a 4 inch star it is approx 2 feet per wire per turn… so yup. seems like a lot but is not.
Thanks for doing the math, Jake! You’re totally right, makes more sense when you think about it that way. 🙂
What beautiful ornaments! I was wondering how long are the nails that you used? I think the ones I have on hand are too short.
Hi Maureen! I think the nails are about 3 inches long. We used a shorter one on the anchor nail though, so it wouldn’t get in the way while wrapping the star shape. I hope you have some that are long enough! 🙂
I taught a class making these back in 1989. The girls loved making them. so easy. Ours were not in color though. Great for ornaments too!
These are beautiful, I was curious if possible …
what specific gauge wire?
pairing of different gauges or all the same?
and colors did you use?
I have tried to zoom and determine them but seem to be having trouble…
thanks again for all your help and your blog and website!!
Hi Jennifer, I mentioned in the body of the post that I used a combination of 20-30 gauge wire, so sorry if it got buried in the post! I used combinations of different gauges without any issues – in fact it was kind of fun to pair thicker and thinner wires. I used all different colors together: brown + copper, red + green + gold, dark green + light green, blue + gold + brown, gold + silver + green, etc. You can use whatever you like!
Hi, I was wondering what gauge wire did you use? I would like to make some. They are great looking ornaments. Thank you.
Hi Tammy, the post mentions that I used between 20 and 30 gauge wire. I like to combine different gauges, it looks really nice!
How do you get it off the nails? Do you need to take them out?
Hi Dylan, I usually need to remove just one of the nails, then the star will slide off. The nails aren’t stuck in the holes very tightly, so it’s easy to do.
I’m teach a crafts class and we used the leftover round reed from making our grapevine baskets to make these stars. Our stars were 5″ to 8″ and soaking the reed worked beautifully. Some students had success with the thin flat reed (less than 3/8″). Also, some students put a little glitter on the points of the star while others painted of a neutral wash or color to give the star an antique look. It was a great way to use up the leftover reed.
Great idea! Thank you for sharing!